ESP 32 Membuat ESP32 Web Server - Arduino IDE
ESP 32 Membuat ESP32 Web Server - Arduino IDE
Tujuan
Kita akan mengontrol lampu LED dengan ESP32 sebagai kontroler melalui Web Browser, ESP32 akan diprogram sebagai web server, pemograman ESP32 menggunakan Software Arduino IDE.
Kalau mau lihat hasil videonya, bisa klik link youtube channel saya dibawah ini:
Proyek Overview
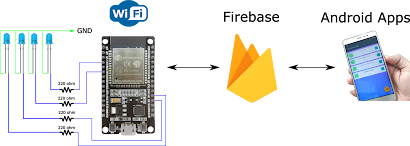
- Web server ESP32 control 4 leds, dihubungkan ke ESP32 pin GPIO 2 , GPIO 4 , GPIO 34 , GPIO 32.
- Kita dapat mengakses ESP32 melalui web browser dengan cara menelusuri IP Addres ESP32
- Jika kita mengklik tombol on/off pada web browser maka status LED akan berubah.
Rangkaian
Pertama :
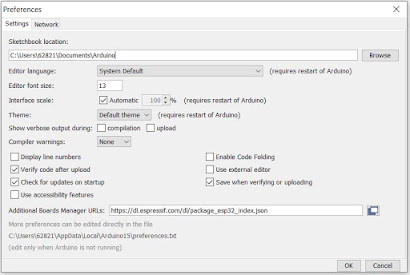
Kita memerlukan ESP32 board di Arduino IDE, bagi yang belum punya silahkan klik link dibawah ini untuk cara install ESP32 board, jika sudah ada kita bisa lanjut.
ESP32 : How to connect ESP32 to Wifi Network
Kedua :
Part yang dibutuhkan :
- ESP32 WROOM 32 Devkit
- 4 buah lampu LEDs 5mm
- 4 buah Resistors 220 ohm
- Jumper cables

Schematic

ESP32 Web Server Code :
/*********Tech WanPatner for Development*********/// Load Wi-Fi library#include <WiFi.h>// Replace with your network credentialsconst char* ssid = "namawifi"; // Your wificonst char* password = "password"; // wifi password// Set web server port number to 80WiFiServer server(80);// Variable to store the HTTP requestString header;// Auxiliar variables to store the current output stateString output2State = "off";String output4State = "off";String output33State = "off";String output32State = "off";// Assign output variables to GPIO pinsconst int output2 = 2;const int output4 = 4;const int output33 = 33;const int output32 = 32;// Current timeunsigned long currentTime = millis();// Previous timeunsigned long previousTime = 0;// Define timeout time in milliseconds (example: 2000ms = 2s)const long timeoutTime = 2000;void setup() {Serial.begin(115200);// Initialize the output variables as outputspinMode(output2, OUTPUT);pinMode(output4, OUTPUT);pinMode(output33, OUTPUT);pinMode(output32, OUTPUT);// Set outputs to LOWdigitalWrite(output2, LOW);digitalWrite(output4, LOW);digitalWrite(output33, LOW);digitalWrite(output32, LOW);// Connect to Wi-Fi network with SSID and passwordSerial.print("Connecting to ");Serial.println(ssid);WiFi.begin(ssid, password);while (WiFi.status() != WL_CONNECTED) {delay(500);Serial.print(".");}// Print local IP address and start web serverSerial.println("");Serial.println("WiFi connected.");Serial.println("IP address: ");Serial.println(WiFi.localIP());server.begin();}void loop(){WiFiClient client = server.available(); // Listen for incoming clientsif (client) { // If a new client connects,currentTime = millis();previousTime = currentTime;Serial.println("New Client."); // print a message out in the serial portString currentLine = ""; // make a String to hold incoming data from the clientwhile (client.connected() && currentTime - previousTime <= timeoutTime) { // loop while the client's connectedcurrentTime = millis();if (client.available()) { // if there's bytes to read from the client,char c = client.read(); // read a byte, thenSerial.write(c); // print it out the serial monitorheader += c;if (c == '\n') { // if the byte is a newline character// if the current line is blank, you got two newline characters in a row.// that's the end of the client HTTP request, so send a response:if (currentLine.length() == 0) {// HTTP headers always start with a response code (e.g. HTTP/1.1 200 OK)// and a content-type so the client knows what's coming, then a blank line:client.println("HTTP/1.1 200 OK");client.println("Content-type:text/html");client.println("Connection: close");client.println();// turns the GPIOs on and offif (header.indexOf("GET /2/on") >= 0) {Serial.println("GPIO 2 on");output2State = "on";digitalWrite(output2, HIGH);} else if (header.indexOf("GET /2/off") >= 0) {Serial.println("GPIO 2 off");output2State = "off";digitalWrite(output2, LOW);} else if (header.indexOf("GET /4/on") >= 0) {Serial.println("GPIO 4 on");output4State = "on";digitalWrite(output4, HIGH);} else if (header.indexOf("GET /4/off") >= 0) {Serial.println("GPIO 4 off");output4State = "off";digitalWrite(output4, LOW);}else if (header.indexOf("GET /33/on") >= 0) {Serial.println("GPIO 33 on");output33State = "on";digitalWrite(output33, HIGH);} else if (header.indexOf("GET /33/off") >= 0) {Serial.println("GPIO 33 off");output33State = "off";digitalWrite(output33, LOW);}else if (header.indexOf("GET /32/on") >= 0) {Serial.println("GPIO 32 on");output32State = "on";digitalWrite(output32, HIGH);} else if (header.indexOf("GET /32/off") >= 0) {Serial.println("GPIO 32 off");output32State = "off";digitalWrite(output32, LOW);}// Display the HTML web pageclient.println("<!DOCTYPE html><html>");client.println("<head><meta name=\"viewport\" content=\"width=device-width, initial-scale=1\">");client.println("<link rel=\"icon\" href=\"data:,\">");// CSS to style the on/off buttons// Feel free to change the background-color and font-size attributes to fit your preferencesclient.println("<style>html { font-family: Monaco; display: inline-block; margin: 0px auto; text-align: center;}");client.println(".button { background-color: #4CAF50; border: none; color: white; padding: 16px 40px;");client.println("text-decoration: none; font-size: 30px; margin: 2px; cursor: pointer;}");client.println(".button2 {background-color: #FF0000;}</style></head>");// Web Page Headingclient.println("<body><h1>ESP32 Web Server</h1>");client.println("<body><h2>Youtube : Tech Wan</h2>");// Display current state, and ON/OFF buttons for GPIO 2client.println("<p>Condition GPIO 2 - State " + output2State + "</p>");// If the output26State is off, it displays the ON buttonif (output2State=="off") {client.println("<p><a href=\"/2/on\"><button class=\"button button2\">OFF</button></a></p>");} else {client.println("<p><a href=\"/2/off\"><button class=\"button\">ON</button></a></p>");}// Display current state, and ON/OFF buttons for GPIO 4client.println("<p>Condition GPIO 4 - State " + output4State + "</p>");// If the output4State is off, it displays the ON buttonif (output4State=="off") {client.println("<p><a href=\"/4/on\"><button class=\"button button2\">OFF</button></a></p>");} else {client.println("<p><a href=\"/4/off\"><button class=\"button\">ON</button></a></p>");}// Display current state, and ON/OFF buttons for GPIO 33client.println("<p>Condition GPIO 33 - State " + output33State + "</p>");// If the output33State is off, it displays the ON buttonif (output33State=="off") {client.println("<p><a href=\"/33/on\"><button class=\"button button2\">OFF</button></a></p>");} else {client.println("<p><a href=\"/33/off\"><button class=\"button\">ON</button></a></p>");}// Display current state, and ON/OFF buttons for GPIO 32client.println("<p>Condition GPIO 32 - State " + output32State + "</p>");// If the output33State is off, it displays the ON buttonif (output32State=="off") {client.println("<p><a href=\"/32/on\"><button class=\"button button2\">OFF</button></a></p>");} else {client.println("<p><a href=\"/32/off\"><button class=\"button\">ON</button></a></p>");}client.println("</body></html>");// The HTTP response ends with another blank lineclient.println();// Break out of the while loopbreak;} else { // if you got a newline, then clear currentLinecurrentLine = "";}} else if (c != '\r') { // if you got anything else but a carriage return character,currentLine += c; // add it to the end of the currentLine}}}// Clear the header variableheader = "";// Close the connectionclient.stop();Serial.println("Client disconnected.");Serial.println("");}
}
Uploading the code
- Tools --> Board --> ESP32 Arduino --> ESP32 Dev Module
- Tools --> PORT --> Click available port
- Sketch --> Upload --> wait "Connecting .... " --> push boot/flash button ESP32

Testing
- Open Serial Monitor
- Copy IP Address

- Open web browser --> Type IP address

- Sudah muncul tampilan di layar monitor web browser kan, kalau belum periksa lagi IP address nya, sudah benar atau belum.
- Jika sudah, 4 buah tombol yang ada pada web browser itu mewakili 4 buah lampu led yang ada pada ESP32, jadi jika kita tekan tombol pertama ke posisi "ON" maka lampu LED akan menyala, begitu juga selanjutnya
Kesimpulan
Dengan menggunakan ESP32 sebagai web server, kita dapat mengendalikan lampu LED dari manapun kita berada selamat ada jaringan internet. Jika ada pertanyaan silahkan ditanya di kolom komentar, Terima Kasih.
Komentar
Posting Komentar